Precision Aerial Dispenser User Guide
This guide will help you set up and use your Precision Aerial Dispenser.

Welcome!
Thanks for choosing the Defendry Aerial Platform to help make your aerial law enforcement faster, safer, & easier!
This guide will help you set and use your Precision Aerial Dispenser, the hardware component of the Defendry Aerial Platform.
If you ever need help beyond what is provided in this guide, please contact your Defendry representative or send us a message. We’d love to help.
Table of Contents


Parts Reference Map
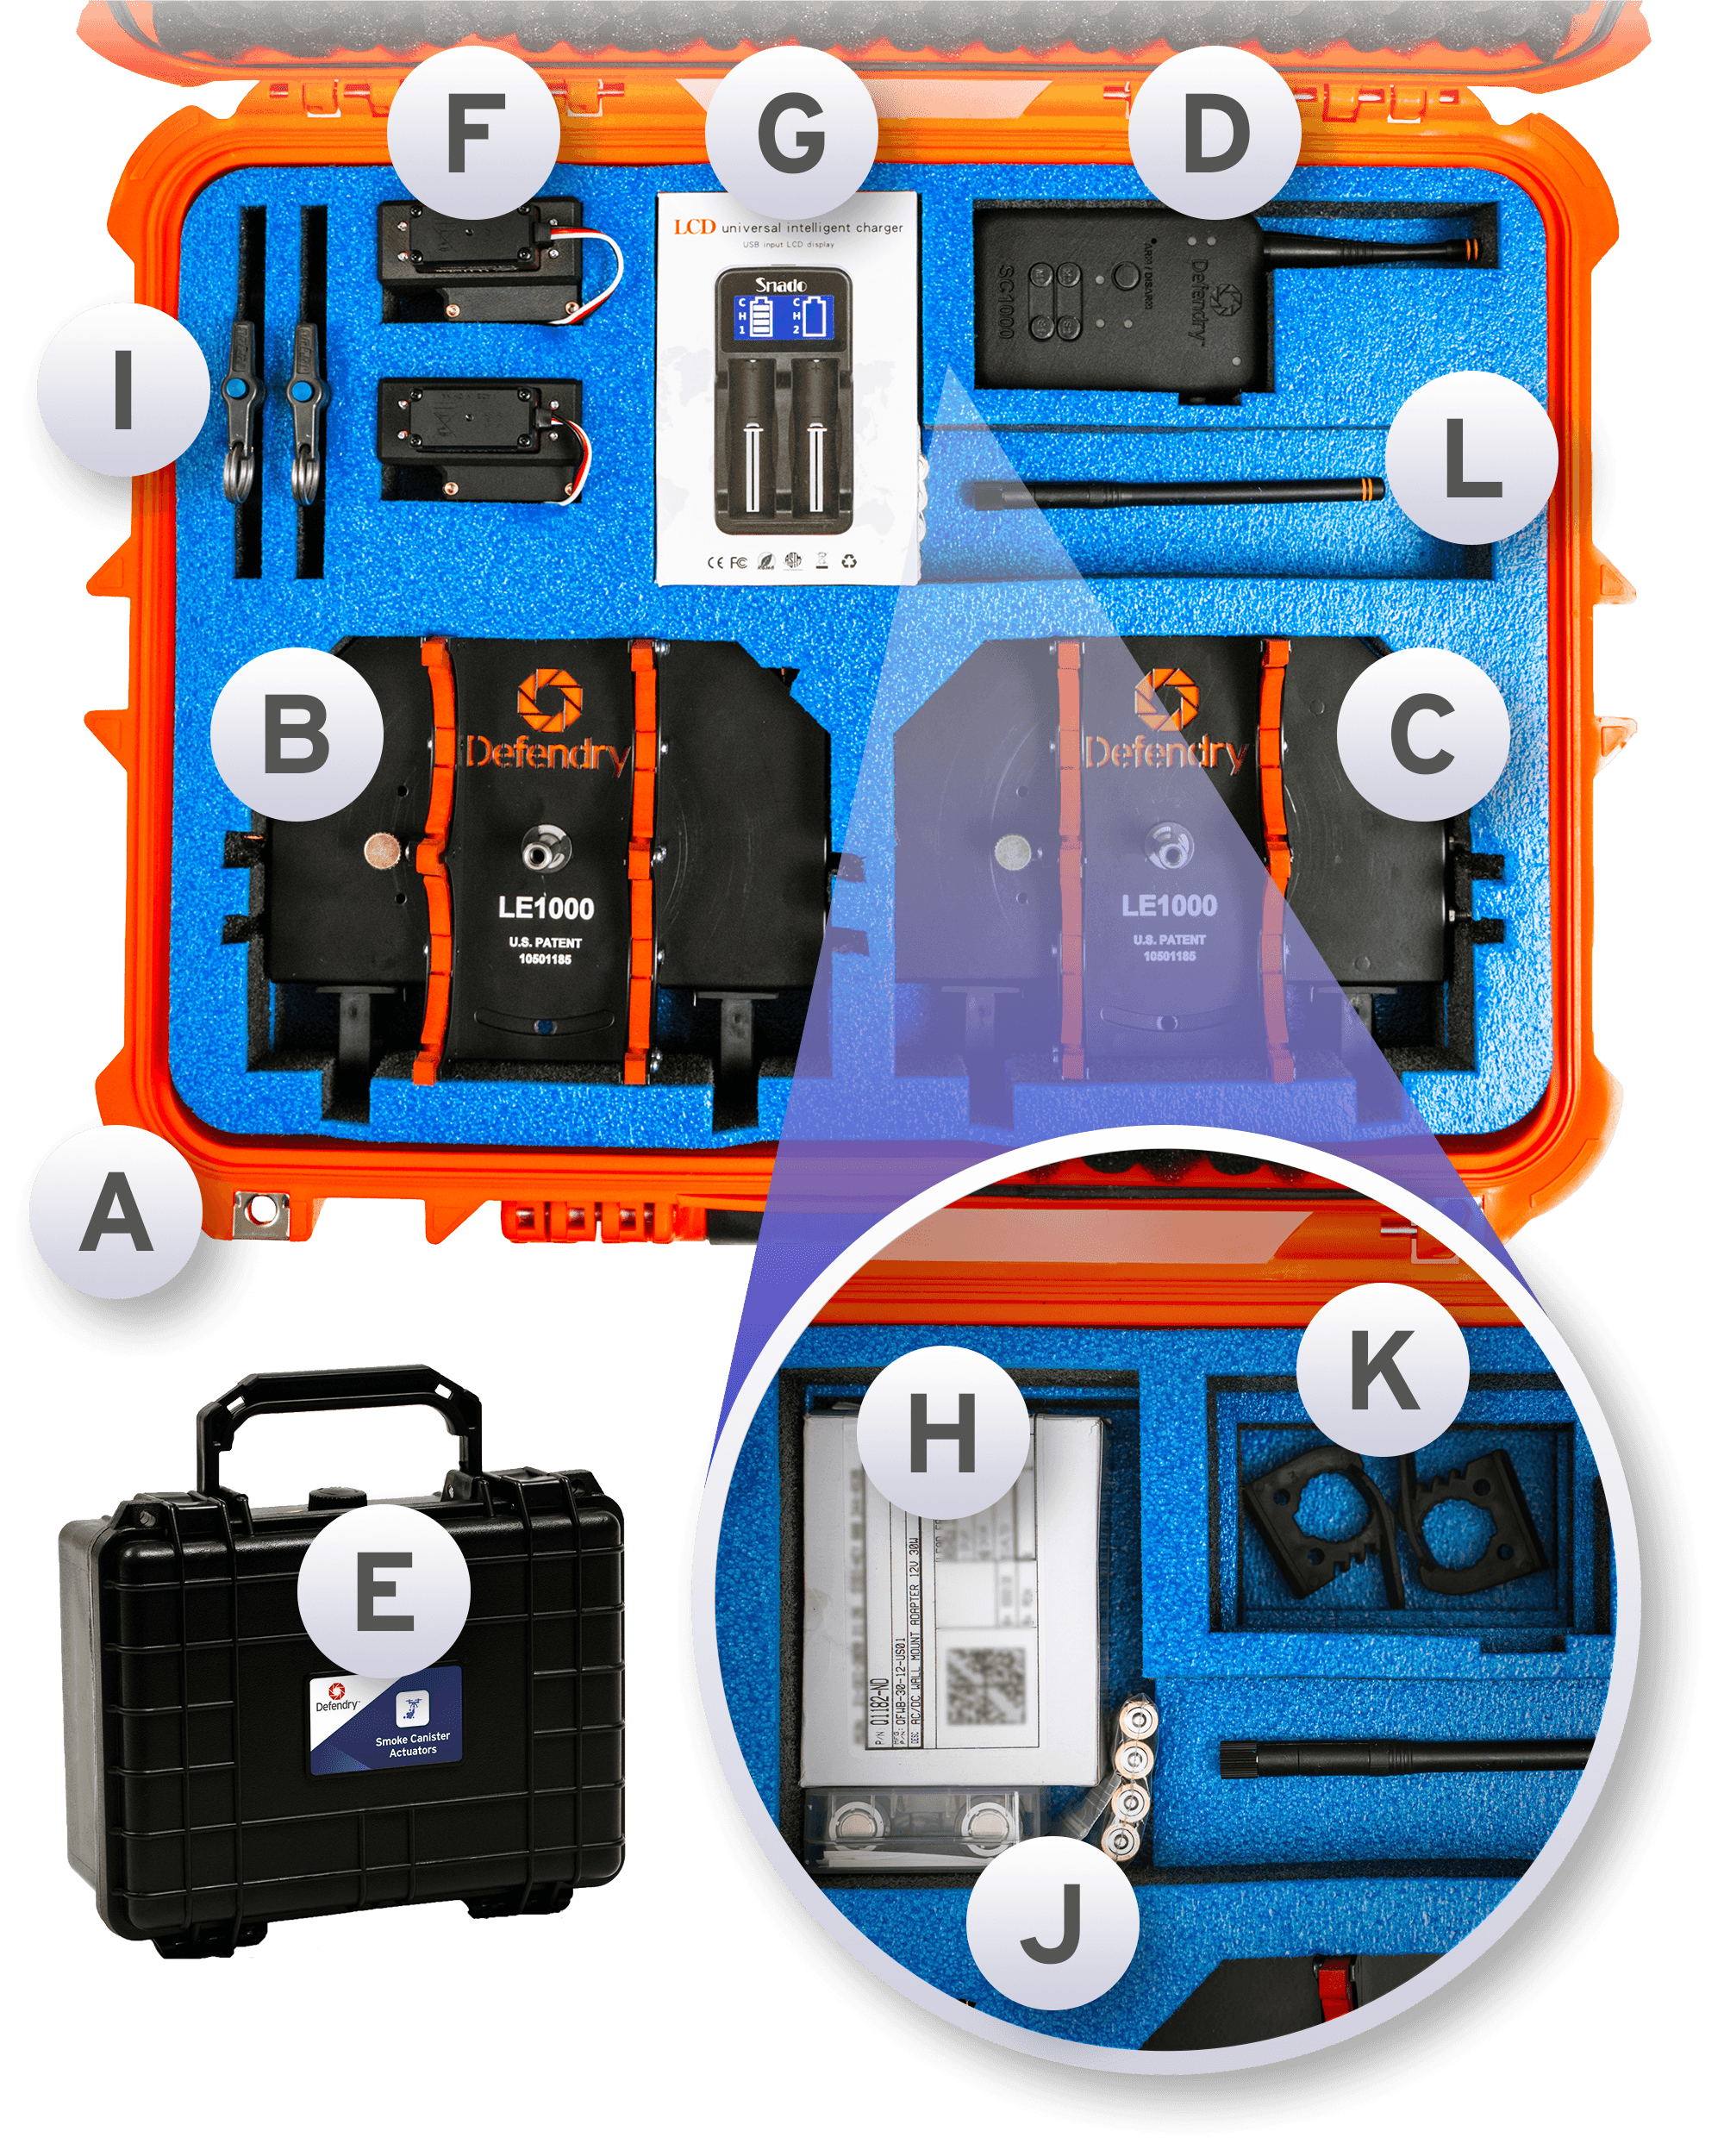

Part Descriptions

Weatherproof Protective Case
 The storage case is constructed from highly durable polypropylene to protect the contents from any moisture, impact, and dust. The built-in purge valve equalizes pressure so you can easily open the case after changing elevations. The latches are strong, secure, and open easily. This product case is also IP65 rated ensuring that it is waterproof and dustproof.

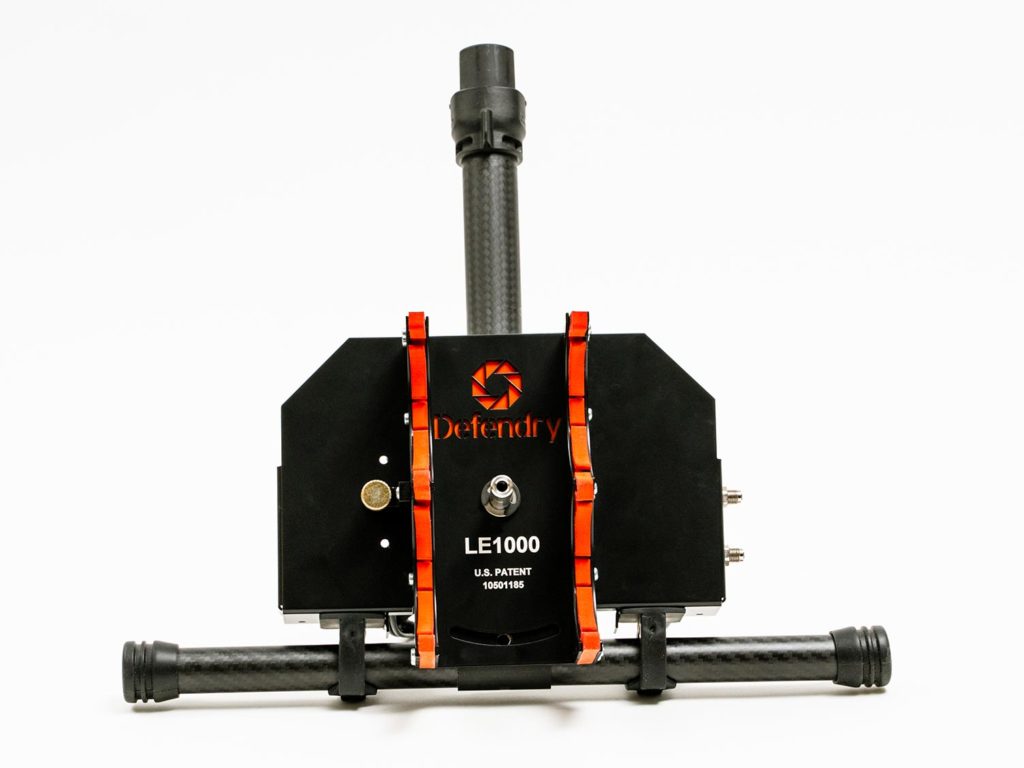
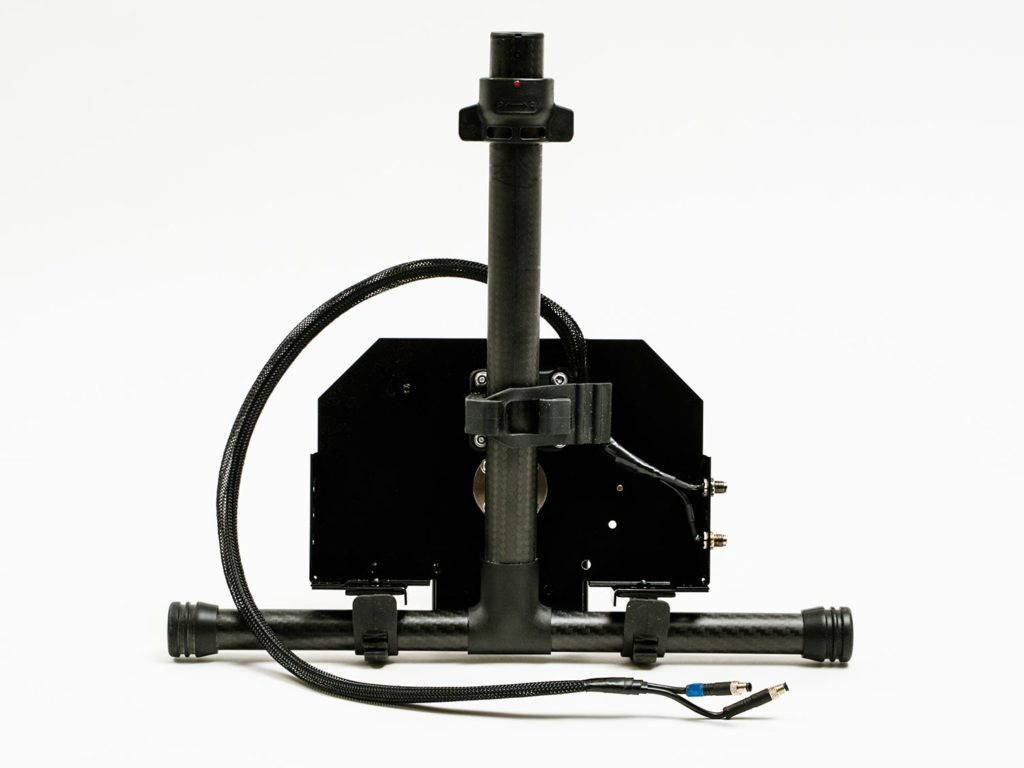
Main LE1000 Panel
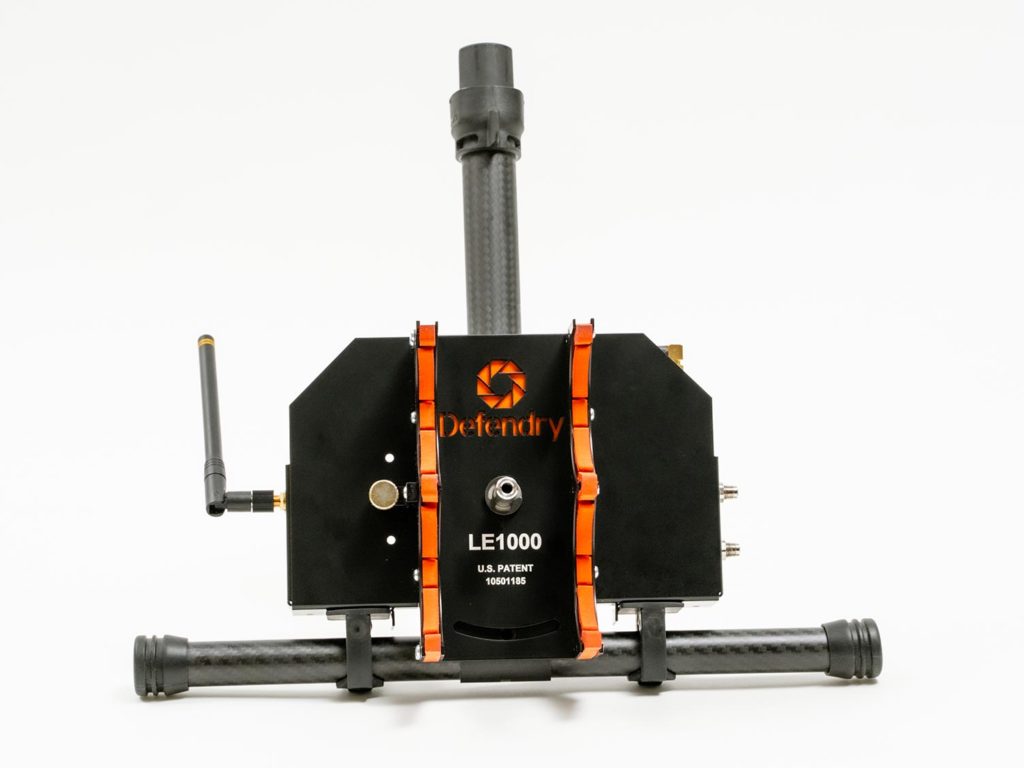 The Main LE1000 Panel is the side of the Precision Aerial Dispenser that houses the electrical “brains” of the system.
The Main LE1000 Panel can attach to either leg of your drone; the Secondary LE1000 Panel simply attaches to the other leg, and a Tether Cable connects them together to enable the Main LE1000 Panel to send signals to the Secondary LE1000 Panel.
CANISTER CAPACITY
The Main LE1000 Panel can carry either 2 aerosol canisters (large-payload drones only) or 2 smoke canisters at the same time, but never 1 of each canister at the same time.
ELECTRICAL BOX
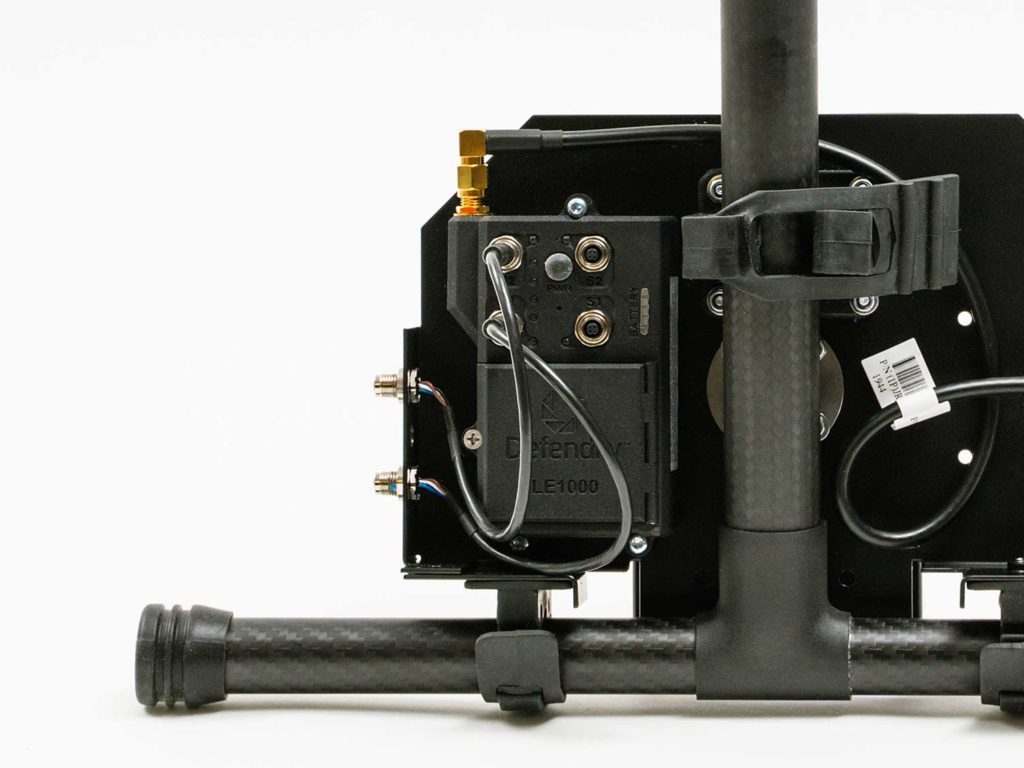 The electrical box contains a LE1000 microchip and is responsible for receiving signals from the SC1000 Remote Control, detonating any munition canisters on board, and powering the Secondary LE1000 Panel.
PANEL CLAMPS
The Main LE1000 Panel attaches to the leg of the drone via 3 rubber strap clamps. The straps provide a highly reliable, tight grip and ensure a firm hold on the equipment so that it does not fall off the drone no matter the speed, height, or weather conditions.
BATTERY LIFE
The battery life of the Main LE1000 Panel is approximately 4 hours in armed mode and approximately 24 hours in standby mode.
The five LED lights on the box show the current battery status. Each LED represents 20% of the charge. For example, when all five are lit, the battery is at 100% charge; and when none are lit, the battery is at 0% charge.

Secondary LE1000 Panel
 The Secondary LE1000 Panel attaches to the opposite leg of your drone as the Main LE100 Panel to carry up to 2 additional canisters and provide counter-balance weight for the drone.
CANISTER CAPACITY
The Secondary LE1000 Panel can carry either 2 aerosol canisters (large-payload drones only) or 2 smoke canisters at the same time, but never 1 of each canister at the same time.
TETHER CABLE
 The Secondary LE1000 Panel connects to the Main LE1000 Panel via the Tether Cable.
PANEL CLAMPS
The Secondary LE1000 Panel attaches to the leg of the drone via 3 rubber strap clamps designed identically to those on the Main LE1000 Panel. The straps provide a highly-reliable, tight grip and ensure a firm hold on the equipment so that it does not fall off the drone no matter the speed, height, or weather conditions.

SC1000 Remote Control
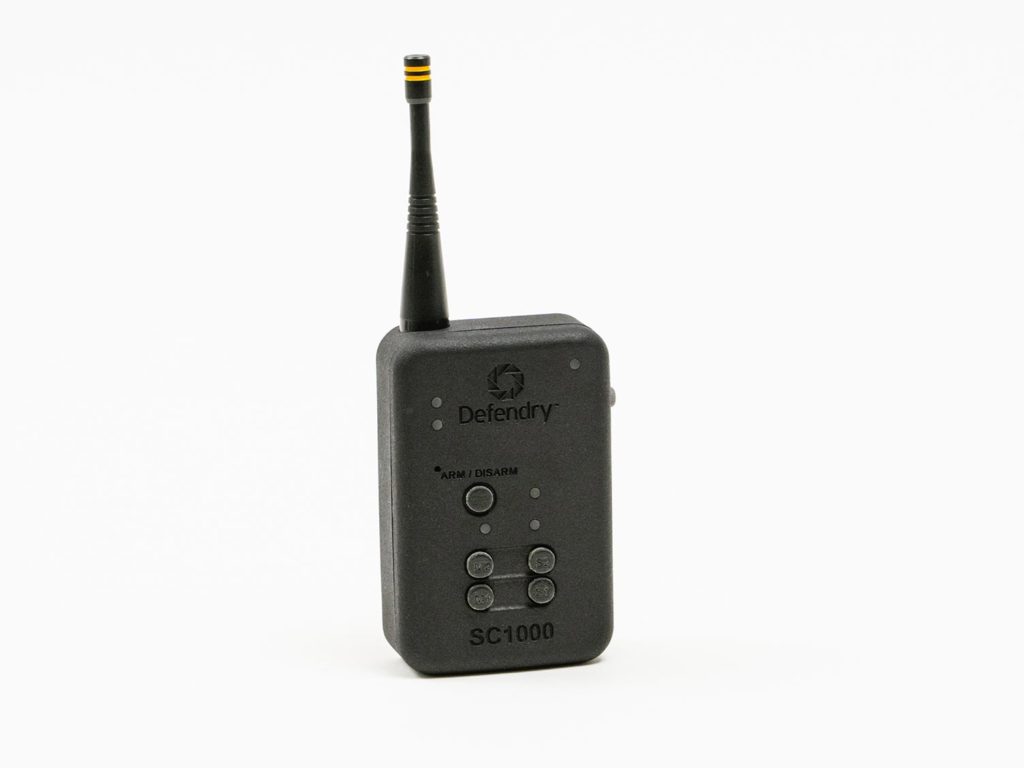 The SC1000 Remote Control can control the Main LE1000 Panel from up to 600 yards away.
The handheld SC1000 Remote Control device does not have rechargeable batteries and requires four AAA batteries to operate.

Smoke Canister Actuators
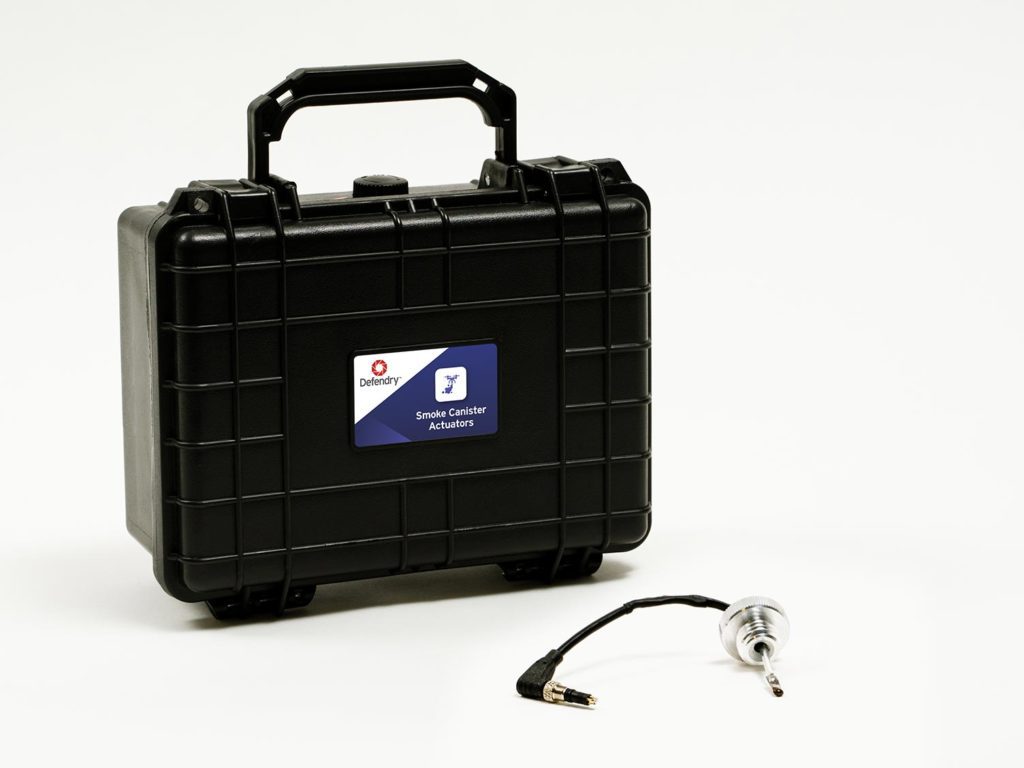 A Smoke Canister Actuator delivers the electric signal that ignites a smoke canister.
Each actuator comes with a protective safety shunt on the end that prevents accidental ignition. The shunt must be removed prior to use. Once removed, the shunt may also be reattached to save the actuator for future use.
NOTE: Smoke Canister Actuators cannot be reused, and they are disposable.

Aerosol Canister Actuators
 Two aerosol canister actuators are included, which are IP66 certified ensuring a waterproof performance.

External Battery Charger
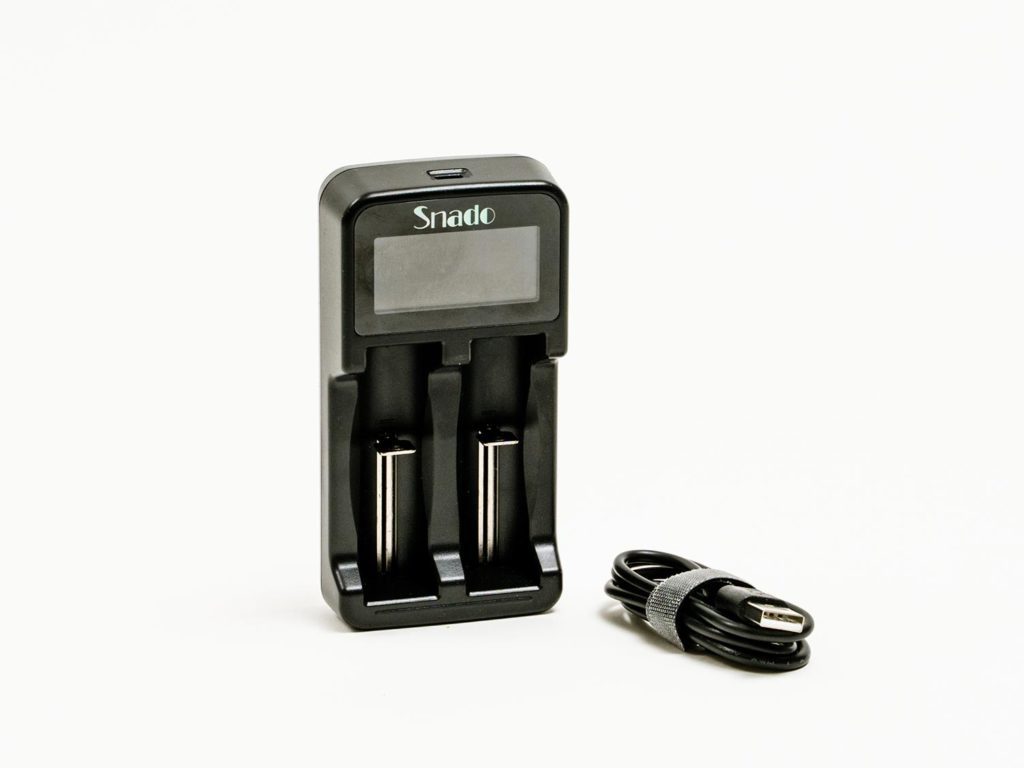 The Main LE1000 Panel batteries can be removed and charged by the External Battery Charger, which can charge two batteries simultaneously.
The charger automatically stops when complete, continuously monitors battery temperatures to prevent overheating, and automatically selects the appropriate voltage and charge mode. This charger is compatible with Li-ion batteries 18650, 18490, 18350, 17670, 17500, 16340(RCR123), 14500, Ni-MH/Ni-Cd, A, AA, AAA batteries, and 3.7V lithium batteries.

Internal Battery Charger
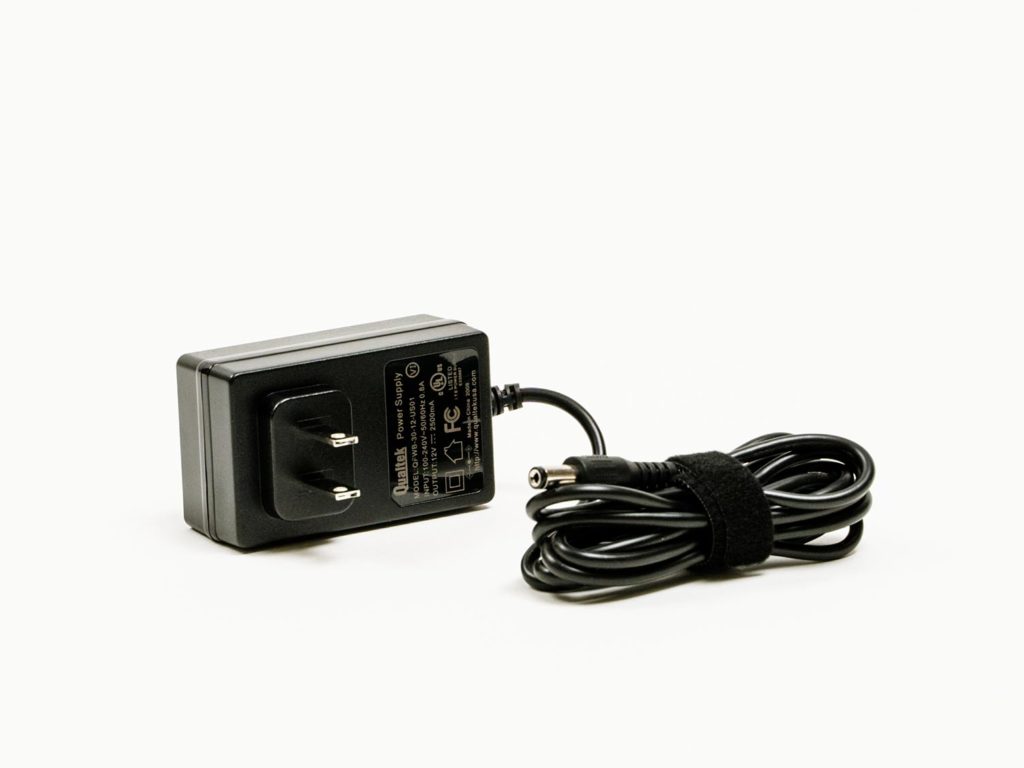 The Main LE1000 Panel batteries can alternatively be charged directly (while still housed inside the Main LE1000 Panel) with the Internal Battery Charger. The internal charger is an AC/DC Wall mount adapter with 12 Volts and 30 Watts Power consumption. The charger’s efficiency level VI rated, and the operating temperature is between 0 C to 40 C. The output connector plug dimensions are 2.1mm I.D. x 5.5mm O.D. x 11.0mm, and the length of cord is roughly 59inches. The charger’s dimension is 2.1mm I.D. x 5.5mm O.D. x 11.0mm, and the weight is 105.23g.

Canister Clamps
 The Canister Clamps securely connect canisters to the Main LE1000 Panel and Secondary LE1000 Panel.

Batteries
Batteries for the remote and Main LE1000 Panel are provided.

Alternate Panel Clamps
 These alternate clamps are provided for attaching the Main LE1000 Panel and Secondary LE1000 Panel to the smaller drone legs of a DJI Matrice 200 drone, if desired.

Antenna
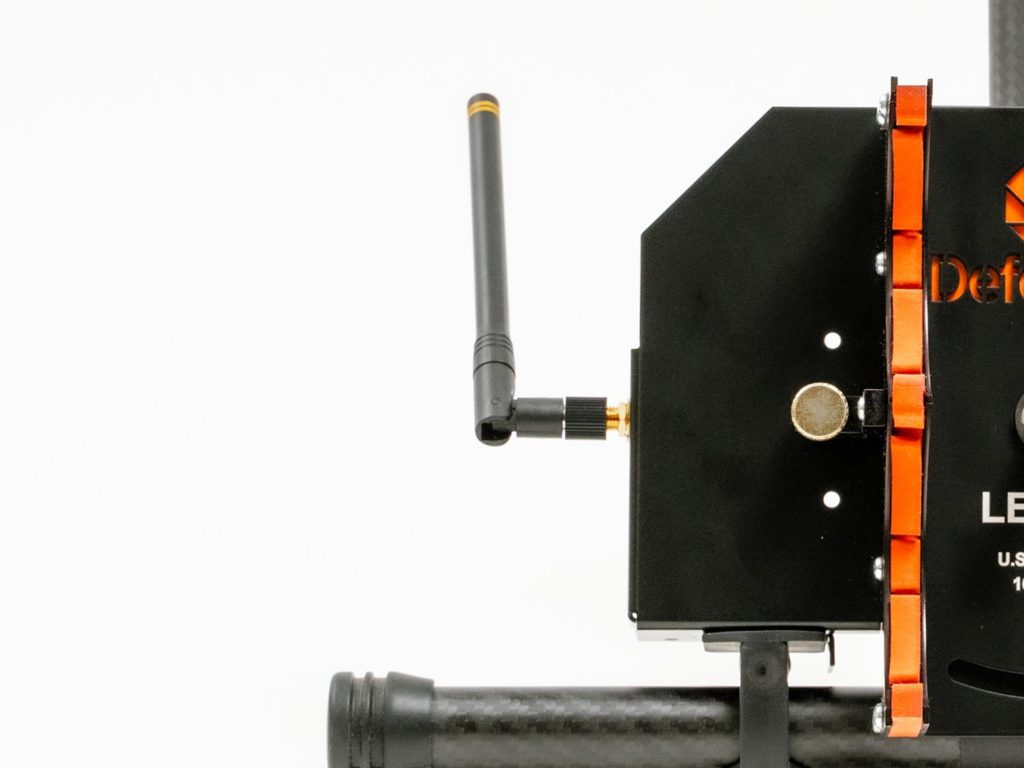 The Antenna attaches to the Main LE1000 Panel to enable communication with the SC1000 Remote Control.

Compatibility
DRONE COMPATIBILITY
- DJI Matrice 200 Series
- DJI Matrice 300 Series
- DJI Matrice 600 Series
- Other Large-Payload, T-Leg Drones
CANISTER COMPATIBILITY
Defense Technology / Safariland
- Riot Control Grenades
- Model 1080
- Model 1082
- Saf-Smoke™ Grenades
- Model 1063
- Colored Smoke Grenades
- Model 1062
- Model 1064
- Model 1065
- Model 1067
- First Defense® MK-9 Aerosol Projectors
- Model 5099
- Model 5299
- Model 56392
- Model 56795
- Model 9005
- Model 56895
- Model 43953
- Model 56792
- Model 56095
- Model 5199
- Model 5199F
- Model 5196

Setup Guide

Charge Batteries
Charge the Main LE1000 Panel batteries using either the External Battery Charger or the Internal Battery Charger prior to use.

Mount Panels On Drone
 Connect the Main LE1000 Panel and Secondary LE1000 Panel to your drone. It does not matter which leg of your drone to which you connect either panel.
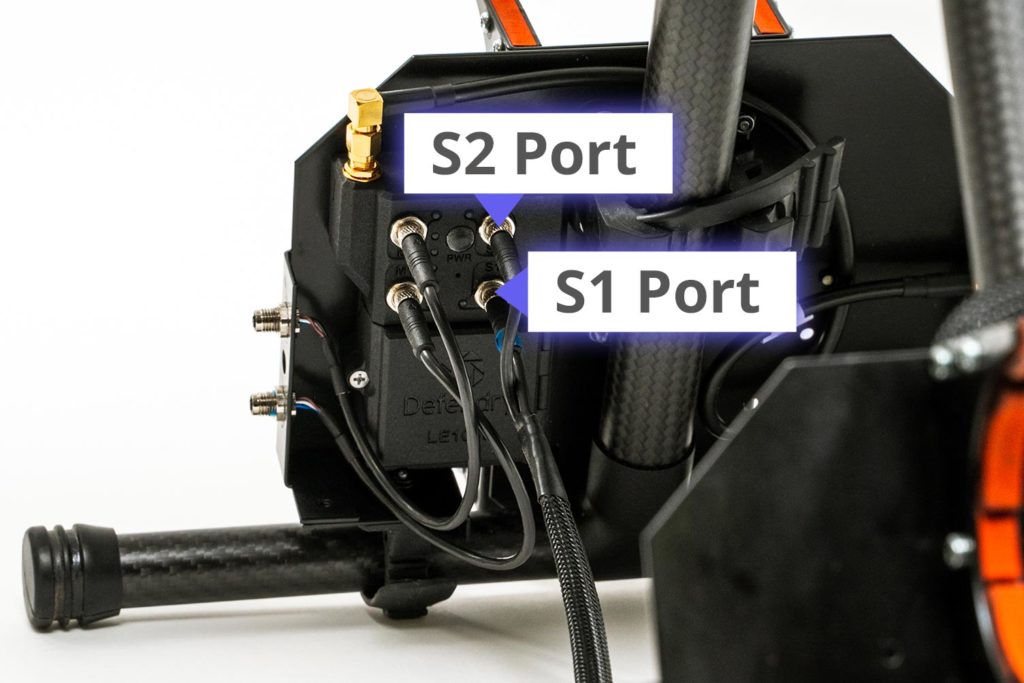 Connect the Secondary LE1000 Panel’s tether cable to the Main LE1000 Panel by attaching the S1 connector (does not have a yellow band) to the S1 port, and attaching the S2 connector marked by a yellow band (band not shown in picture) to the S2 port.
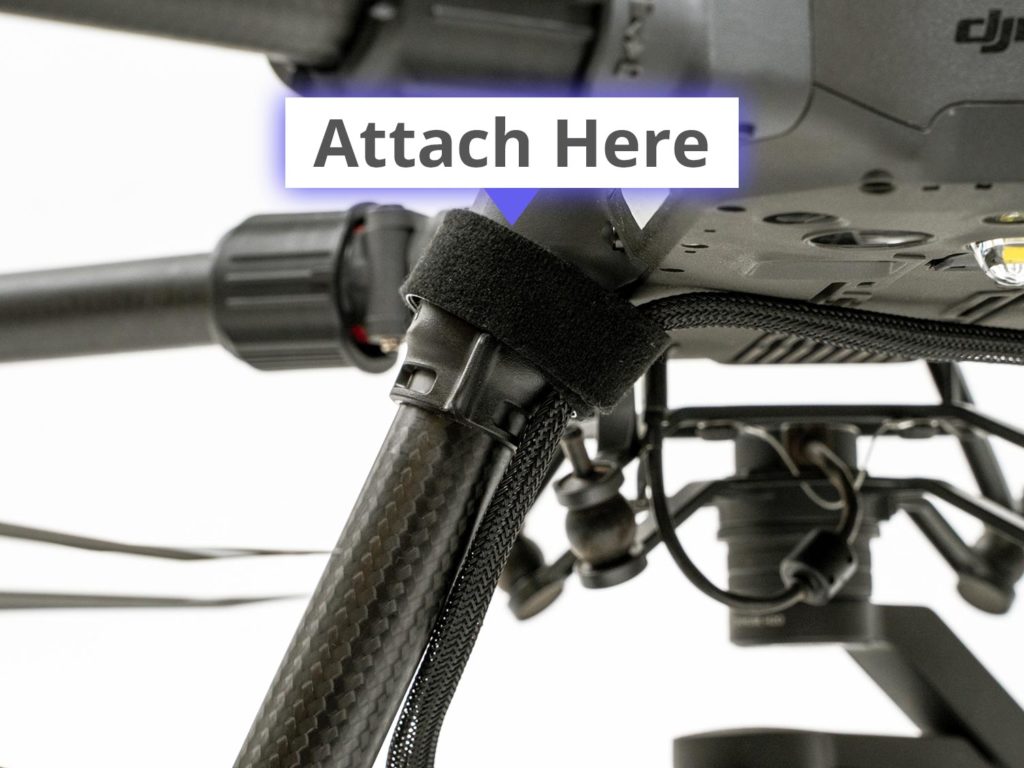 To prevent the tether cable from dangling, attach the cable to the top of your drone’s leg with velcro.
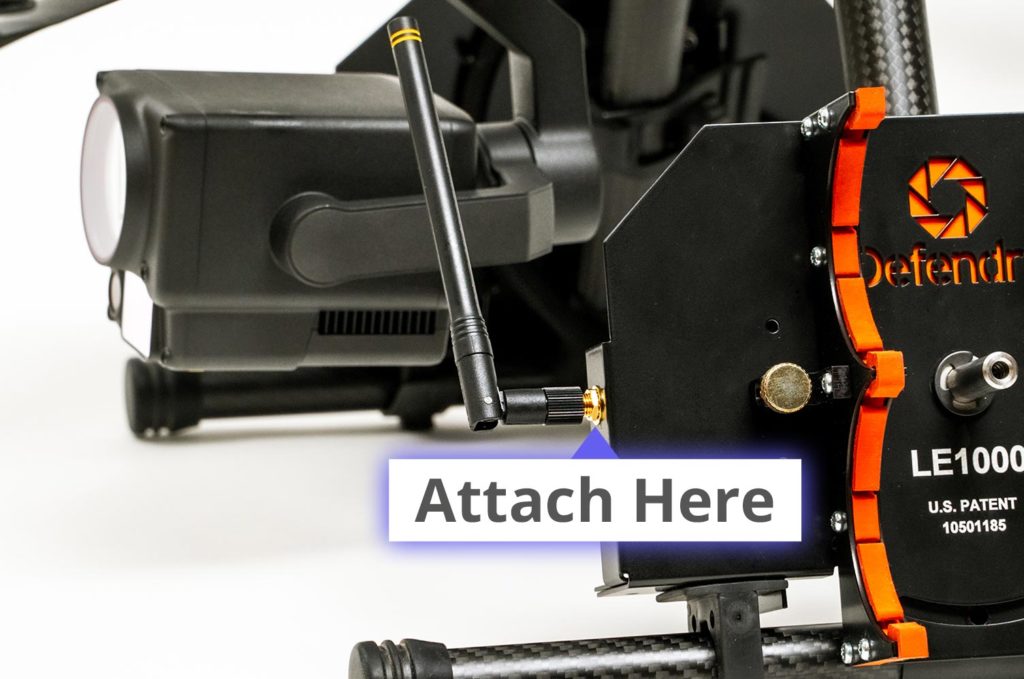 Next, attach the Antenna to the Main LE1000 Panel.

Attach Canisters
The Main LE1000 Panel can carry either 2 aerosol canisters or 2 smoke canisters at the same time, but never 1 of each canister at the same time.
The Secondary LE1000 Panel can likewise carry either 2 aerosol canisters or 2 smoke canisters at the same time, but never 1 of each canister at the same time.
FOR SMOKE CANISTERS
Step 3.1a – Replace Fuses
 Smoke canisters come equipped with a fuse (M2A1 Type fuse). For each canister, remove the fuse.
 Then connect a Smoke Canister Actuator.
 Next, remove each actuator’s safety shunt. The shunt must be removed prior to use.
NOTE: Smoke Canister Actuators cannot be reused, and they are disposable. If the actuator is not used, the shunt may be reattached to save the actuator for future use.
Step 3.2a – Secure Canisters with Canister Clamps
 Attach the desired number of smoke canisters to each panel, and secure the canisters by fastening the Canister Clamp into each panel.
Step 3.3a – Connect Smoke Canister Actuators to Panels
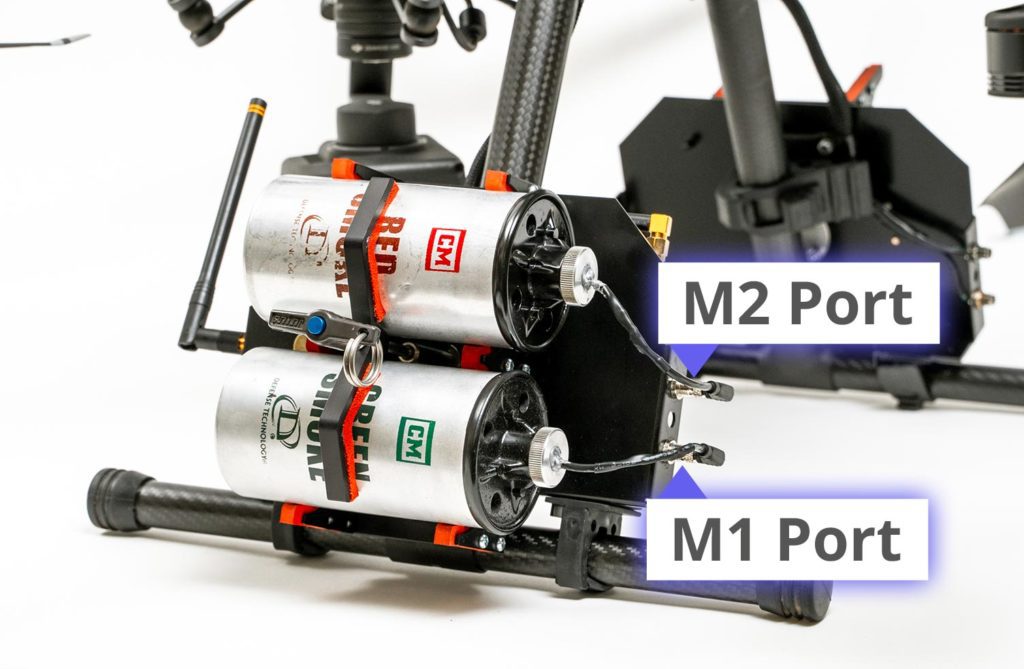 Connect the Smoke Canister Actuators directly to the Main LE1000 Panel in the M1 and M2 ports. The ports correspond to the buttons on the remote.
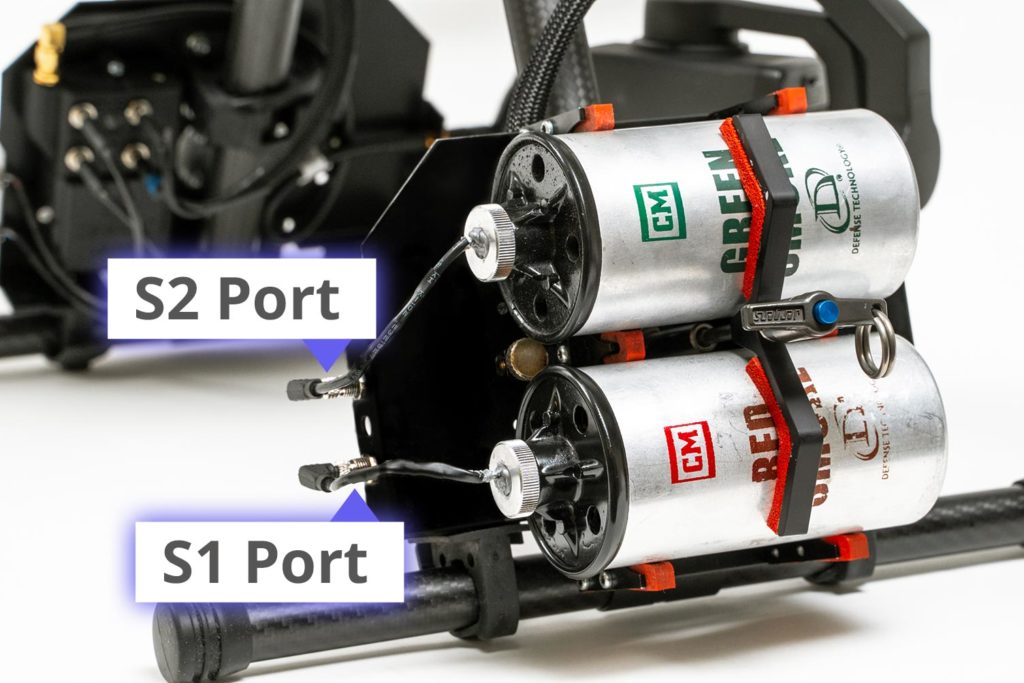 Connect the Smoke Canister Actuators to the Secondary LE1000 Panel in the S1 and S2 ports. The ports correspond to the buttons on the remote.
FOR AEROSOL CANISTERS
Step 3.1b – Remove Canister Handles
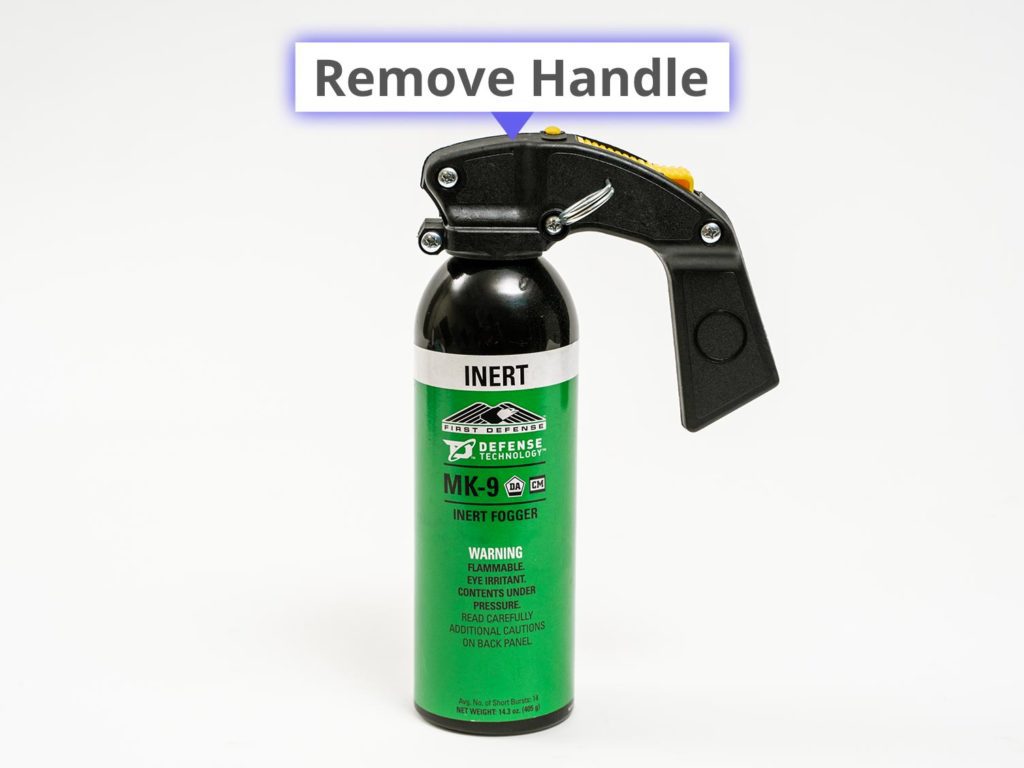 Aerosol canisters come assembled with a handle connected by four screws. Remove the four screws on the aerosol canister handle with a screwdriver.
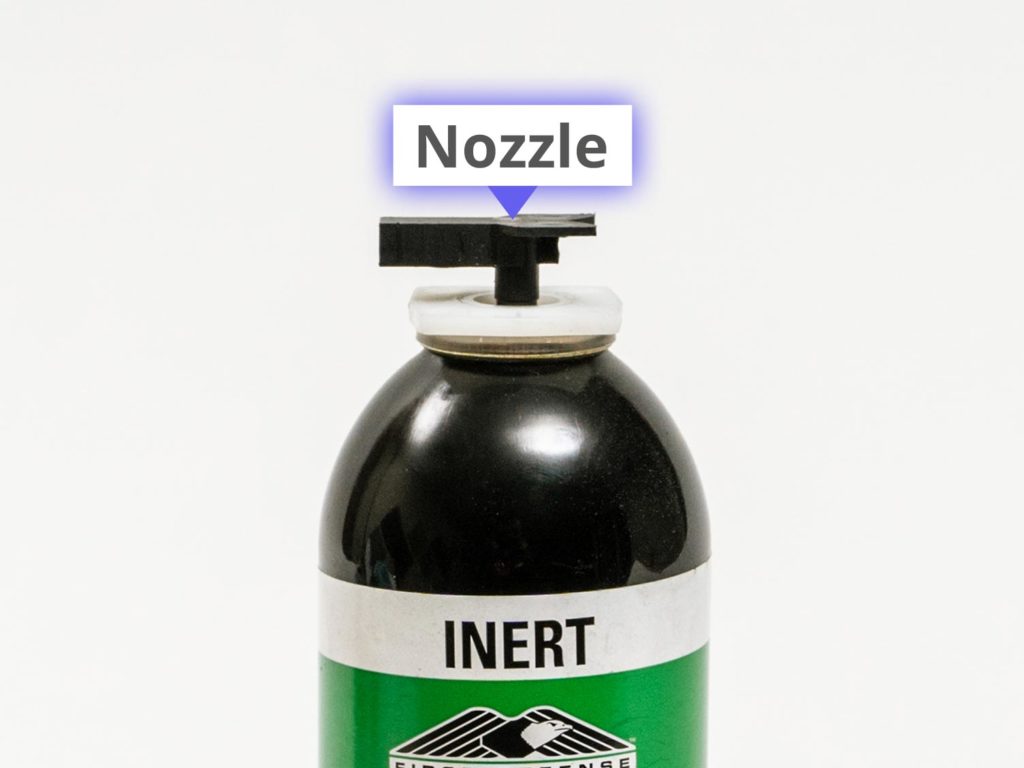 The handle will split into two parts, revealing the nozzle valve.
Step 3.2b – Assemble the Actuator
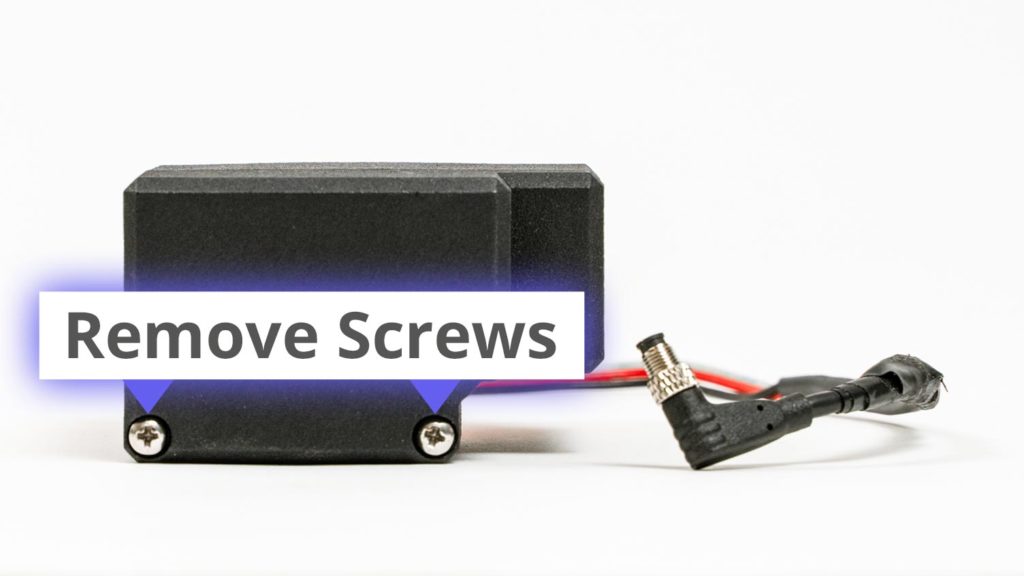 Each Aerosol Canister Actuator is encased in a box connected by two screws. Remove the two screws.
 Attach the actuator onto the valve of the canister.
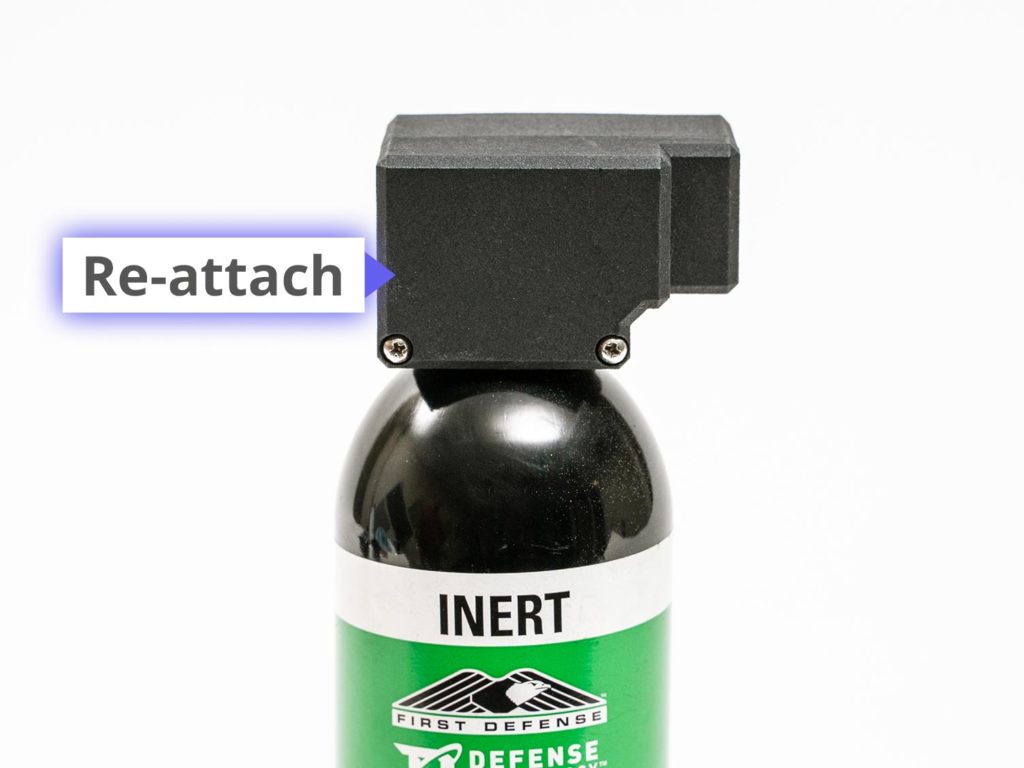 Next, re-attach the removed side of the actuator.
NOTE: Aerosol Canister Actuators are reusable.
Step 3.3b – Secure Canisters with Canister Clamps
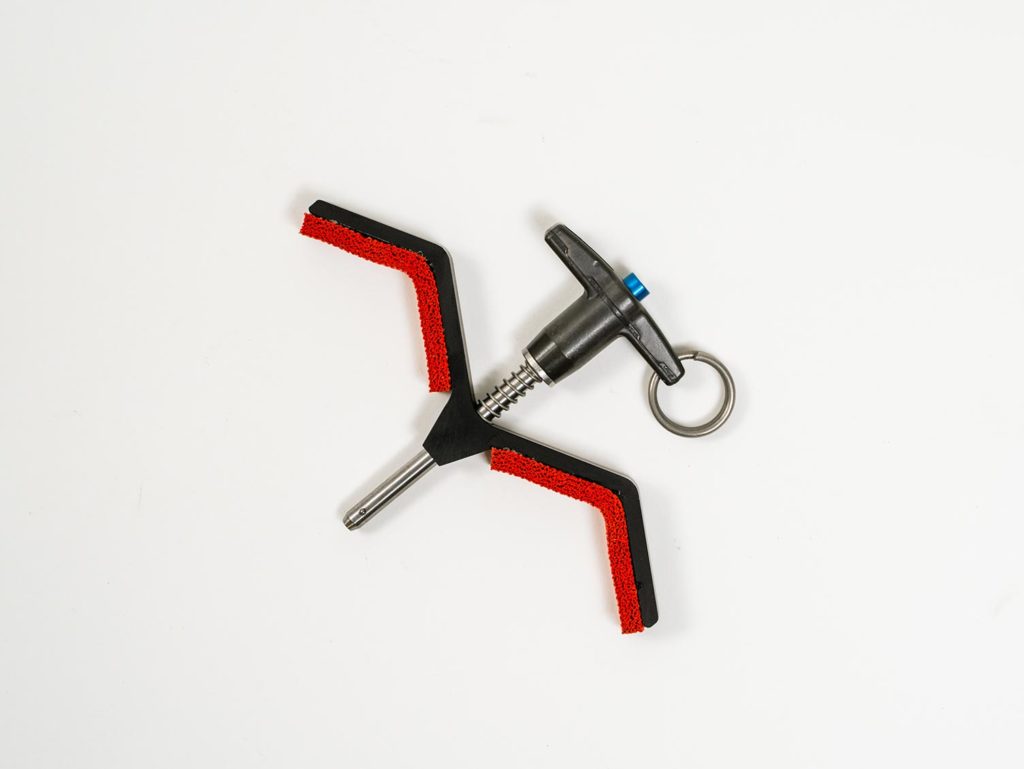
 For maximizing the distribution of contents in aerosol canisters, you can rotate the angle of the canister holder on either panel by pulling the bronze-colored pin and rotating the holder.
 Attach the desired number of smoke canisters to each panel. CRITICAL: ENSURE THE CANISTERS ARE MOUNTED IN THE PROPER DIRECTION AS DESIGNED — UPSIDE DOWN OR RIGHT SIDE UP. IF NOT, THE CANISTERS WILL IMMEDIATELY LOSE AIR PRESSURE AUPON DETONATION AND BECOME UNUSABLE.
Then secure the canisters by fastening the Canister Clamp into each panel.
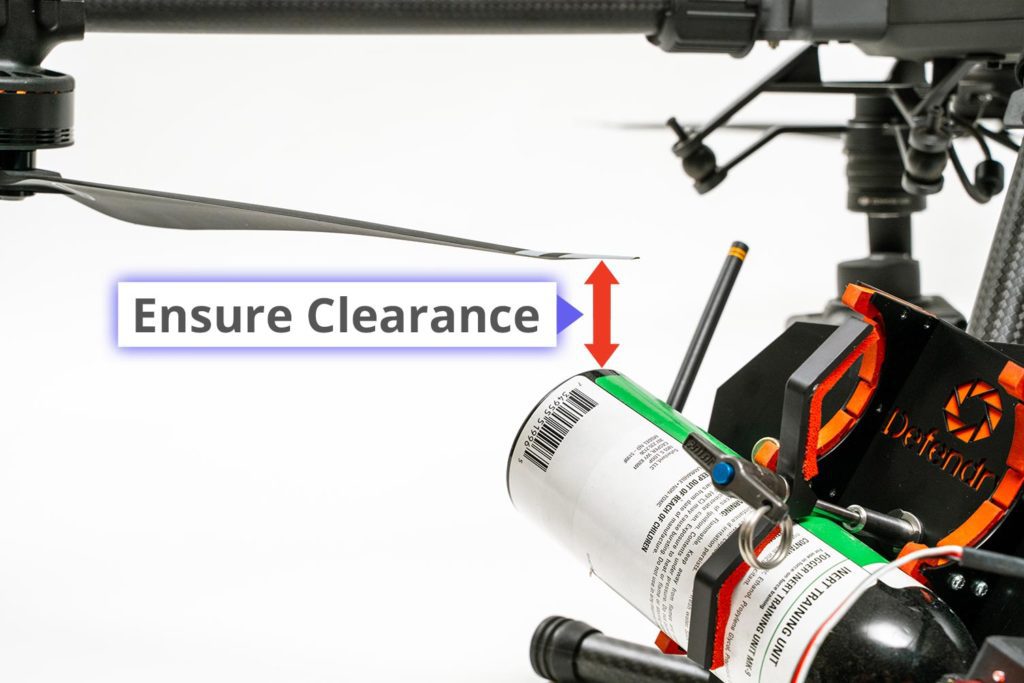 Ensure that all canisters have enough clearance from the rotor blades of the drone. On DJI Matrice 300 drones, the canister must be mounted upside down. On DJI Matrice 200 and Matrice 600 drones, the canister should be mounted right side up.
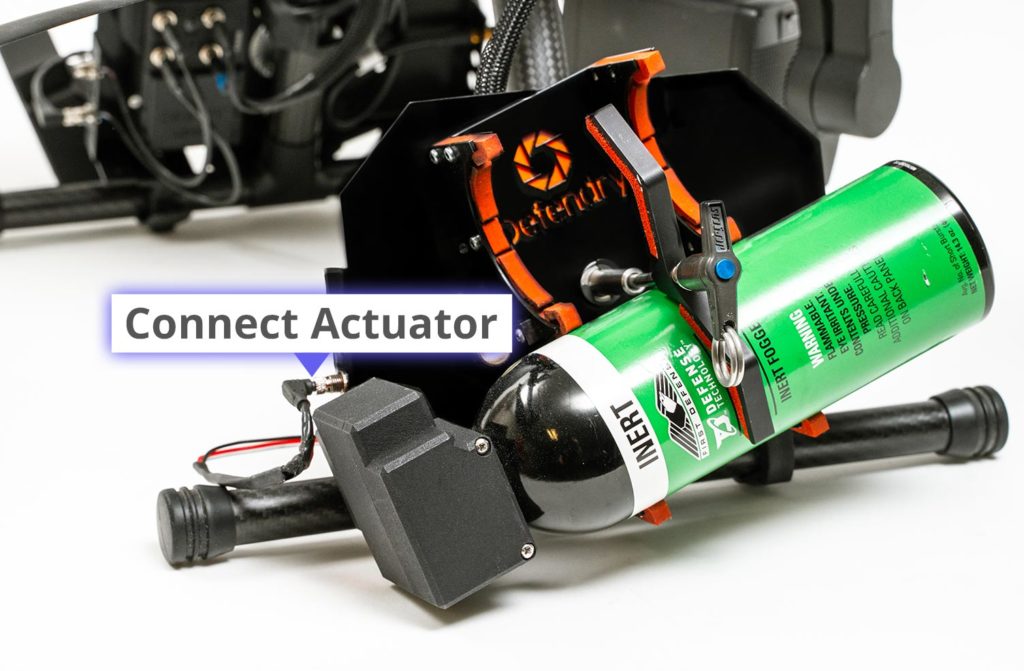
Step 3.4b – Connect Actuator Cable to Main LE1000 Panel
 Connect the Aerosol Canister Actuator(s) directly to the Main LE1000 Panel in the M1 and M2 ports. The ports correspond to the buttons on the remote.
Connect the Smoke Canister Actuator(s) to the Secondary LE1000 Panel in the S1 and S2 ports. The ports correspond to the buttons on the remote.

Turn On Power
Once the Canisters are correctly attached, turn on power.
MAIN LE1000 PANEL
 Locate the power button on the backside of the Main LE1000 Panel. Press and hold the power button for 4 seconds, then release. LED lights will turn on indicating that the panel is on.
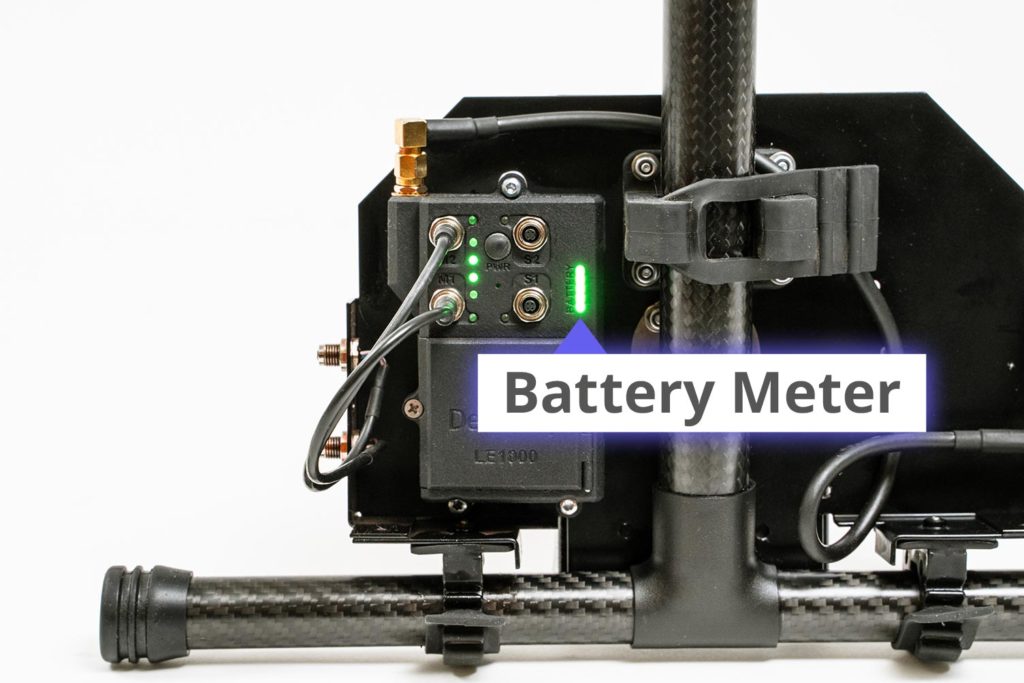 To check battery power, press and hold the power button for 1 to 2 seconds, which will display the current battery charge on the LED indicators labeled “Battery”. Each of the five LED lights represents 20% of the battery charge. For example, when all five are lit, the battery is at 100% charge; and when none are lit, the battery is at 0% charge.
SC1000 REMOTE CONTROL
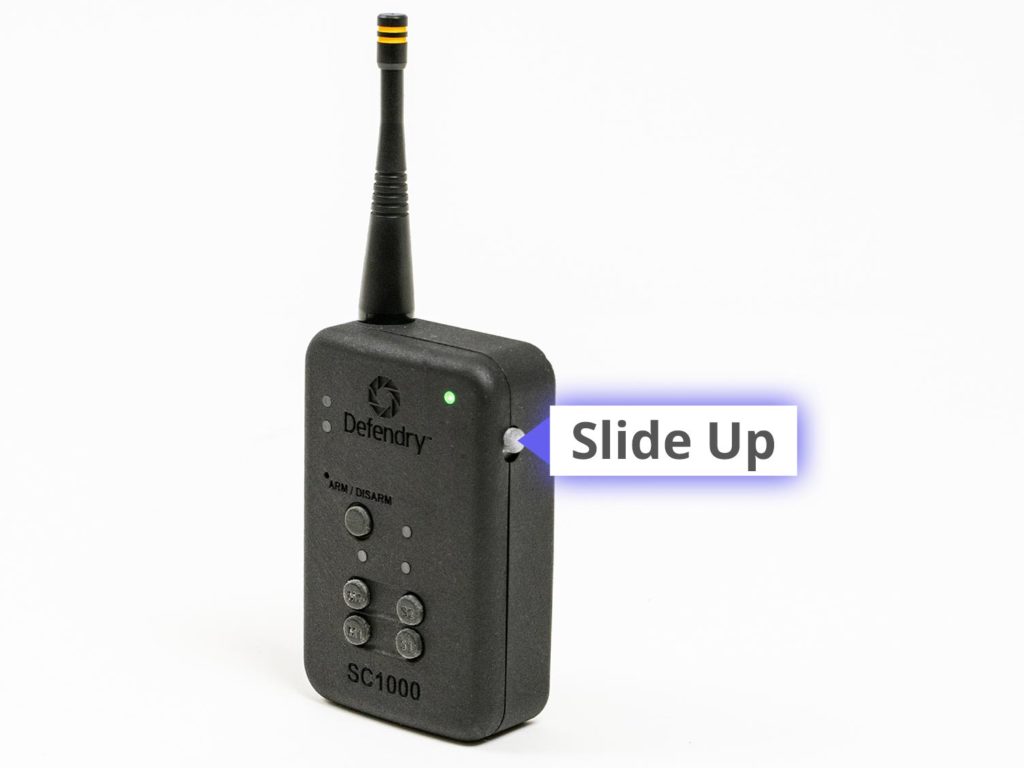 Locate the power button on the upper right side of the remote. Slide the power button up.

Arm The Dispenser
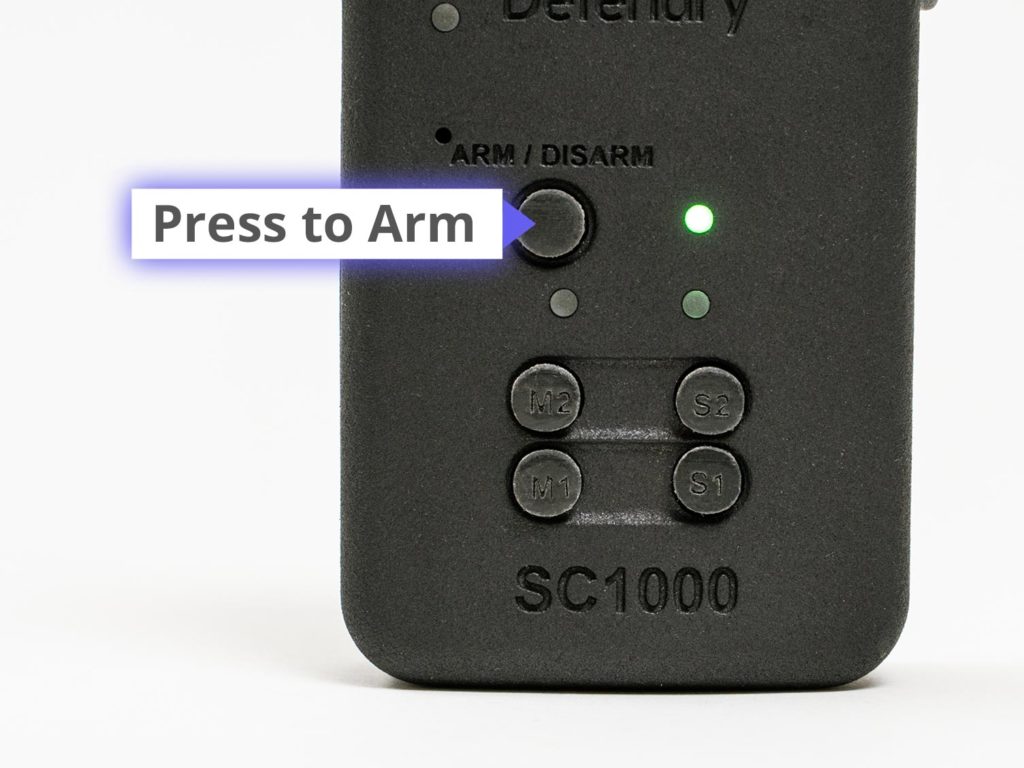 Press the Arm/Disarm button on the SC1000 Remote Control to arm the panels.
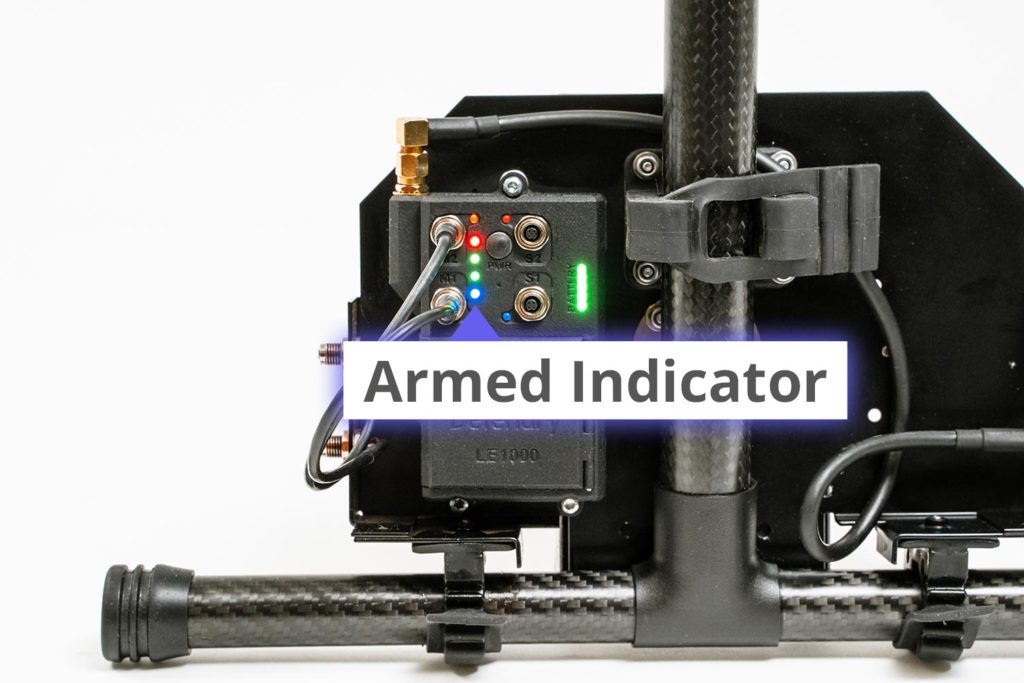 When pressed, an LED light on the SC1000 Remote Control and a blue LED light on the Main LE1000 Panel will start blinking to indicate that the two are paired and ready to fire.
RECOMMENDED: Press the Arm/Disarm button again to disarm the panels until you are ready to fire when the drone is flying near the target.

Dispense
The SC1000 Remote Control can control the Main LE1000 Panel from up to 600 yards away.
Once the Precision Aerial Dispenser is up in the air and ready to fire, re-arm the panels.
 To fire, press the button (M1, M2, S1, or S2) on the SC1000 Remote Control corresponding to the canister you want to detonate on either panel.

Reload
To reload, simply land the drone and replace the canisters following the preceding steps as needed.

Precautions
- Ensure operations and use are conducted in accordance with local, state, and federal requirements and with small, unmanned aerial vehicle manufacturer specifications.
- Ensure payload weight does not exceed the small, unmanned aerial vehicle specifications.
- Landing gear may be exposed to canister smoke/chemical irritants.
- Ensure canisters are securely fastened with no potential to fall off.
- Ensure there is enough rotor clearance for the platform and the canisters attached are compatible with safe operation of the SUAV.
- Ensure that all cables and wires are securely fastened to avoid contact with the rotors.

Warranty
Please refer to your contract for warranty details.

